How to Sign Up Hosting Account with Serverfreak
- 27/04/2010 2:29 PM
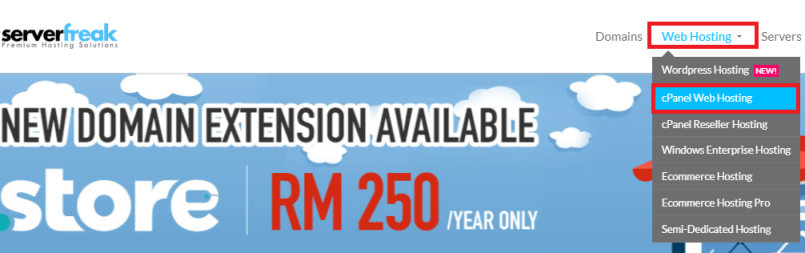
1) Visit our official site e.g. http://www.web-hosting.net.my/ and select “Web Hosting” follow by "cPanel Web Hosting".
2) You shall see a number of our cPanel web hosting plans e.g. Basic, Value, Semi-Pro, Professional & Ultimate.
In this example, we will show you how to sign up for "Semi-Pro" plan. Click on "Order" button

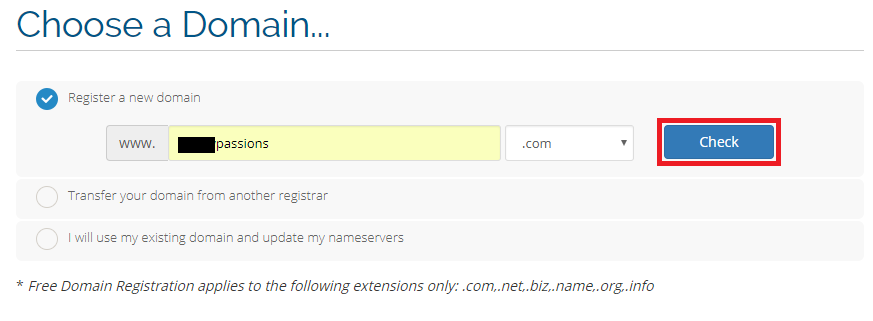
3) In the “Choose a Domain ... ” page, we shall see 3 options here.
Select option 1 if you want to purchase a hosting account plus registering a domain name.
For domain transfer to Serverfreak, select option 2.
If you already owned a domain name but only interested to sign up for hosting only (without ordering domain name), then select option 3
In this example, we shall use option 1. Press the "Check" button to begin the search for your new domain name availability.
4) Scroll down and you shall see the available domain names that can be registered by you.
If the domain name is available for registration, the system will show "Congratulations! Your Domain Name is Available!"
Click on the "Continue" button if you want to proceed to register your new domain name.

5) You shall see your new order description now at the top of the page as well as the billing cycle (you can choose to pay Annually, Biennially or Triennially).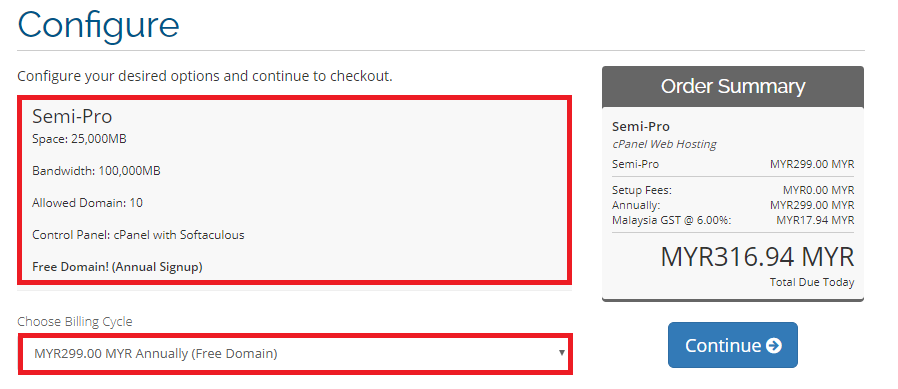
6) Scroll down to view "Available Addons" such as Weebly Website Builder, Addon Dedicated IP, Email Archiving and SpamExperts Antispam.
Only tick the boxes if you're interested to sign up for these Available Addons. Proceed to click the "Continue" button.

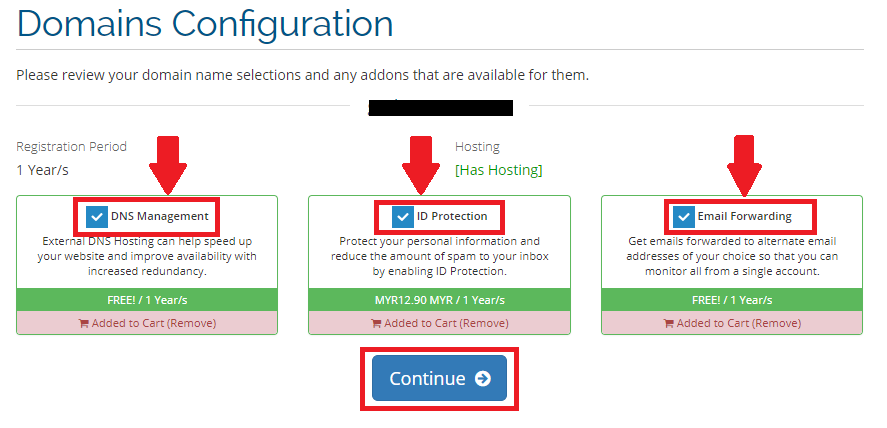
7) Under "Domains Configuration", please check all boxes and hit the "Continue" button.
NOTE: ID Protection is a paid service and you'll be charged with an additional RM 12.90/year fee.
8) Finally you shall see the total amount you need to pay for your purchase.
Note: You can also edit your order by selecting "Empty Cart" if you wish to remove your order.
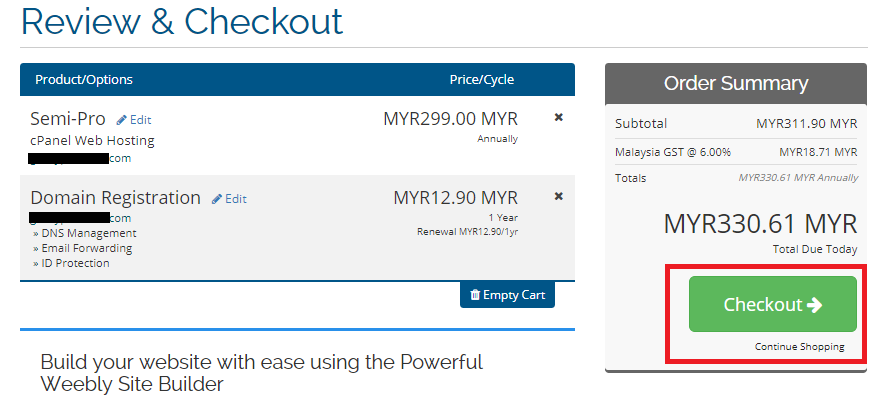
If you're happy with your new purchase details, click on the "Checkout" button to proceed with the payment.
9) Scroll down to fill up your Personal Particulars and Security Question.
Please enter your favourite email address to receive any latest update and renewal notification from us in the future.

Under Domain Registrant Information section, select "Use Default Contact (Details Above)".
For payment method, you can choose 3 different types of payment - Bank Transfer/Cheque, Paypal or MOLPay (Credit Card).
Under "Additional Notes" section, you can insert your request regarding your new purchase (optional).
For example, you can type "I need my new hosting account hosted in Malaysia server/United States server" or "I need RVSiteBuilder installed inside my hosting account"
In this example, we'll choose "Bank Transfer/Cheque". Remember to tick the box for "I have read and agree to the Terms of Service".

Finally, click on the "Complete Order" button to finalize your purchase.
10) An unpaid invoice will be automatically generated by our billing system. Please pay accordingly as shown in the example below.

Note: You can also scroll down and click on the "Print" button to start printing your electronic invoice, or download the invoice to your computer by clicking on the "Download" button.

11) Once you've made the payment, kindly attach the successful payment slip to us as proof of purchase.
You may attach your online payment slip/camera photo or scanned files to https://secure.web-hosting.net.my/support/index.php?/Tickets/Submit
and assign your ticket to our Billing department for verification. Please use the same email address you used to register your Serverfreak Client Account.
11) Once your payment has been verified successfully, we shall send the account login details to your email account.

